PowerApps Portals tracking using Azure Application Insights
Help UKRAINE
 ! Your action matters! Donate
to support Ukrainian Army! Donate to charity funds!
Organize/join street protests in your city to support Ukraine and condemn Russian aggression!
Expose and report Russian disinformation! #StandWithUkraine
! Your action matters! Donate
to support Ukrainian Army! Donate to charity funds!
Organize/join street protests in your city to support Ukraine and condemn Russian aggression!
Expose and report Russian disinformation! #StandWithUkraine Last week I received a request - enable simple analytic functionality for PowerApps Portal like last login details and page views. To be honest I thought that it can be done easily inside the portal itself as I clearly remember reading something like that. And to my surprise, it is not possible to do something like that anymore - all of those features were deprecated. So how can we track all that necessary data? Azure Application Insights to the rescue.
What is Azure Application Insights?
If you never heard about Azure Application Insights here is a small summary for you from Microsoft:
Application Insights is an extensible Application Performance Management (APM) service for web developers on multiple platforms. Use it to monitor your live web application. It includes powerful analytics tools to help you diagnose issues and to understand what users actually do with your app. It’s designed to help you continuously improve performance and usability.” As a result, it allows you to monitor both your web site and different apps in one place in a very convenient and easy way.
In case of a web site, you need to add a small piece of code that will track site usage and send telemetry data to the portal.
Create Azure Application Insights resource
You can start using Azure Application Insights for free if you already have an Azure subscription.
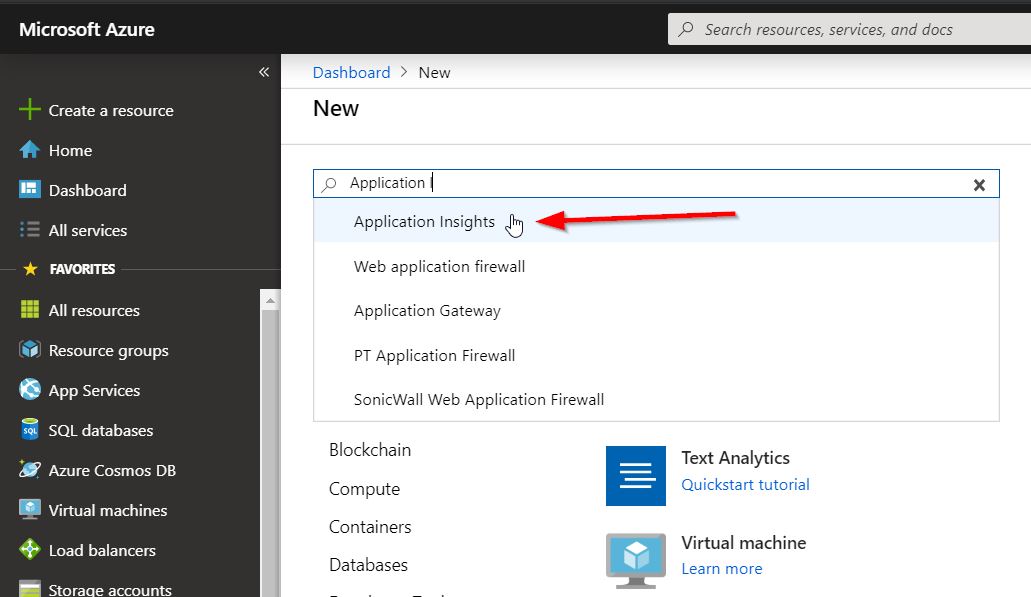
To create Azure Application Insights go to Azure portal, select Create a resource and then type Application Insight and press Enter. It will open the Application Insight creation blade. Press Create button.
Now you need to select your Azure subscription, create or select resource group, provide a name of the instance and select region. After that, you need to press Review + create.

It might take some time for provisioning your resource.
Add tracking script to your PowerApps Portal
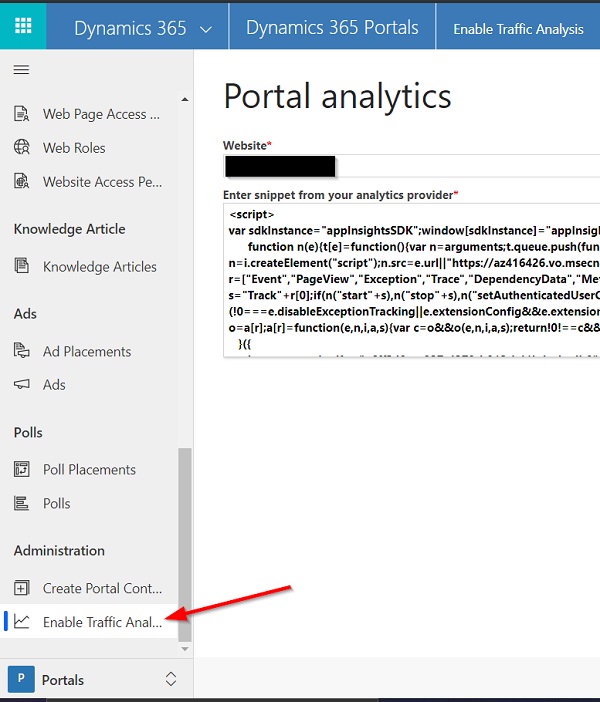
After you created your Azure Application Insights you need to add tracking script that will send data about your web site back to Azure. To do so we need to add that script to each page of our site. Fortunately, Microsoft thought about it. Go to your Dynamics 365 Portals model-driven app. Scroll down to Administration section and select Enable Traffic Analysis (see image below). It will open the Portal analytics page. There select your website and paste code snippet provided below. After you press Save button the script will be added to the bottom of every page in the Portal
IMPORTANT Tracking code snippet below is valid on the date of writing this article. Please refer to THIS PAGE on official documentation to find the latest script.
<script type="text/javascript">
var appInsights=window.appInsights||function(a){
function b(a){c[a]=function(){var b=arguments;c.queue.push(function(){c[a].apply(c,b)})}}var c={config:a},d=document,e=window;setTimeout(function(){var b=d.createElement("script");b.src=a.url||"https://az416426.vo.msecnd.net/scripts/a/ai.0.js",d.getElementsByTagName("script")[0].parentNode.appendChild(b)});try{c.cookie=d.cookie}catch(a){}c.queue=[];for(var f=["Event","Exception","Metric","PageView","Trace","Dependency"];f.length;)b("track"+f.pop());if(b("setAuthenticatedUserContext"),b("clearAuthenticatedUserContext"),b("startTrackEvent"),b("stopTrackEvent"),b("startTrackPage"),b("stopTrackPage"),b("flush"),!a.disableExceptionTracking){f="onerror",b("_"+f);var g=e[f];e[f]=function(a,b,d,e,h){var i=g&&g(a,b,d,e,h);return!0!==i&&c["_"+f](a,b,d,e,h),i}}return c
}({
instrumentationKey: "xxxxxxxx-xxxx-xxxx-xxxx-xxxxxxxx"
});
window.appInsights=appInsights,appInsights.queue&&0===appInsights.queue.length&&appInsights.trackPageView();
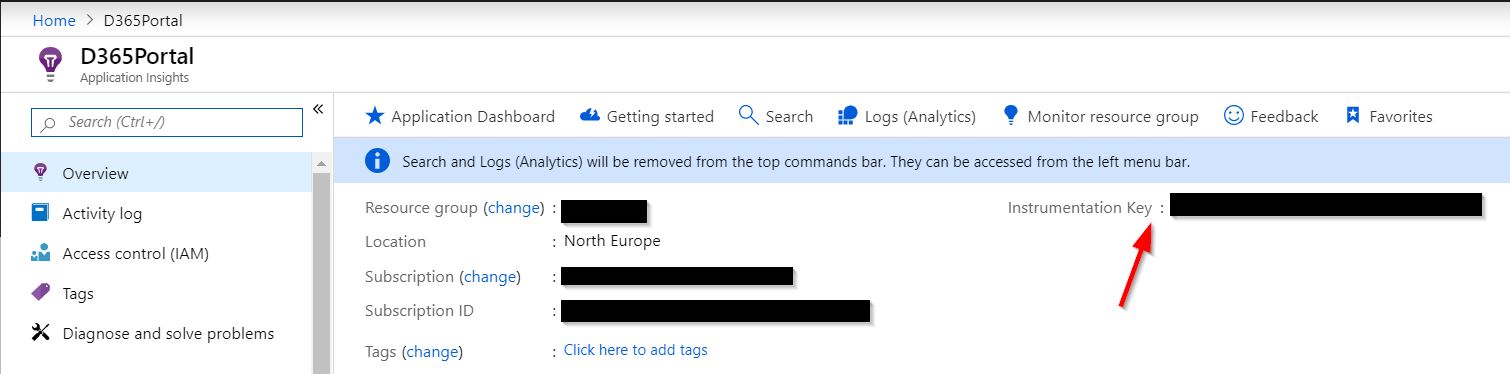
</script>You can notice that code uses Instrumentation Key. It is a unique key associated with your Application Insights instance. To find it open Azure portal, navigate to Application Insights that was created in the previous step. When you open it you can find Instrumentation Key on the right side of the blade (see picture below). Copy it and paste to the code.
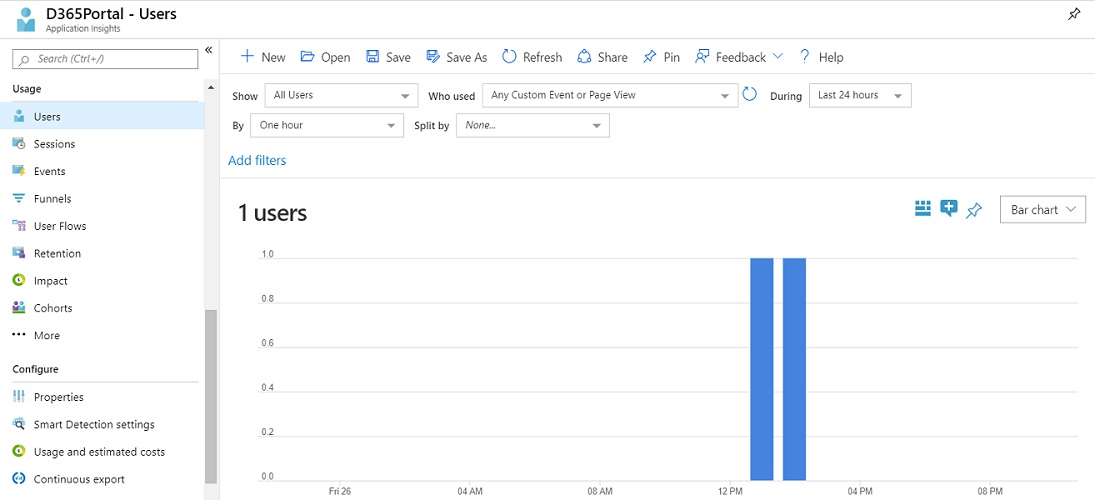
That’s it. Now you can verify that analytics works. Go to your PowerApps Portal and perform some actions like open pages. Then go back to Application Insights and type Users into the setting search bar and select Users option. It will open a chart that shows how many unique users have visited your web site for the last 24 hours.
Tracking authenticated users
One of the things that we needed was to be able to identify users that login to our portal. But if you review events for your users right now you won’t be able to relate them to the contacts. To do so we will need to tell Application Insights id of the authenticated user (contact in our case) and can also add accountId as an additional parameter.
To accomplish this we will use setAuthenticatedUserContext function from SDK. This function has one required parameter (authenticatedUserId) and two optional ( accountId and storeInCookie). This function needs to be called when we identified a specific signed-in user. And here we can use some liquid magic. Add the following code just before the closing script tag of the previous tracking code snippet.
 {% if user %}
    appInsights.setAuthenticatedUserContext('{{user.Id}}', '{{ user.parentcustomerid.Id }}');
 {% else %}
    appInsights.clearAuthenticatedUserContext();
 {% endif %}
What this code will do is when a user is identified (signed-in) we will pass his id and his parent account id to Azure. And when it is not identified we will clear AuthenticatedUserContext using a special function called clearAuthenticatedUserContext.
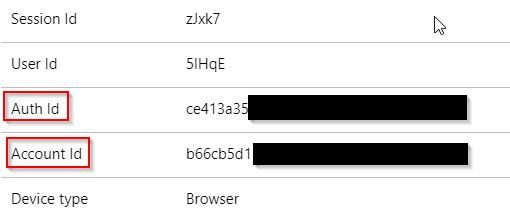
Now you can go back to the PowerApps Portal, sign in and perform some actions. Wait for a little bit and go back to Application Insights. Now if you open some event associated with a user you will see two new parameters Auth Id and Account Id, which will be your user’s contact and account id respectfully. You can also filter by both of those properties in your dashboard.
Conclusion
Application Insights provides an easy way to track your client-side events and issues. There are much more things about Application Insights that I didn’t cover in this article like custom events, just to name a few. I am planning to write more articles about Azure Application Insights and PowerApps Portals, so stay tuned.