Customizing Copilot Agent appearance in Power Pages - Christmas edition
Help UKRAINE
 ! Your action matters!
Donate to support Ukrainian Army!
Donate to charity funds!
Organize/join street protests in your city to support Ukraine and condemn Russian aggression!
Expose and report Russian disinformation! #StandWithUkraine
! Your action matters!
Donate to support Ukrainian Army!
Donate to charity funds!
Organize/join street protests in your city to support Ukraine and condemn Russian aggression!
Expose and report Russian disinformation! #StandWithUkraine
With the holidays upon us, I wanted the last article of the year to be light and on theme for Christmas. And what better way to do that than by making your Power Pages chatbot look more festive? You can see the final result below.
Available styling
First, let’s discuss the prerequisites: you have a Power Pages site on the Enhanced Data Model with a Copilot agent provisioned. We will be customizing the “modern” agent, so if you still have Power Virtual Agent, this guide will not apply.
We will be using this official Microsoft article as a reference point. Spoilers - MS needs to update it, cause some things just don’t work as expected.
To make the standard Copilot agent look better, we want to update the following elements:
- replace the widget icon with something more Christmas-themed
- update the Header of the chat interface with festive colors
- update chat bubbles for the user and Copilot with holiday colors
New icon
According to an article on MS Learn, we need to run the following JS code to replace the icon.
<script>
document.addEventListener('DOMContentLoaded', function() {
   var buttons = document.getElementsByClassName("pva-embedded-web-chat-widget");
    buttons[0].innerHTML = '<img src="<image URL>" height= "70px" width = "70px" />';
}, false);
</script>
The problem with this code is that it should trigger when the initial DOM tree is loaded. However, a “modern” agent is added via - dromroll please - React, so the actual render will occur after the DOM tree finishes loading, and this code won’t work.
Instead, we should use MutationObserver. The MutationObserver interface provides the ability to watch for changes being made to the DOM tree. If you never worked with Mutation Observer before, it is pretty simple - you create an observer object that will watch the target element and call the provided callback function when the changes occur. Those changes can be an addition of a new child element to the DOM tree, an attribute change, such as classes update, etc. Inside the callback function, we can validate what the change is and react accordingly.
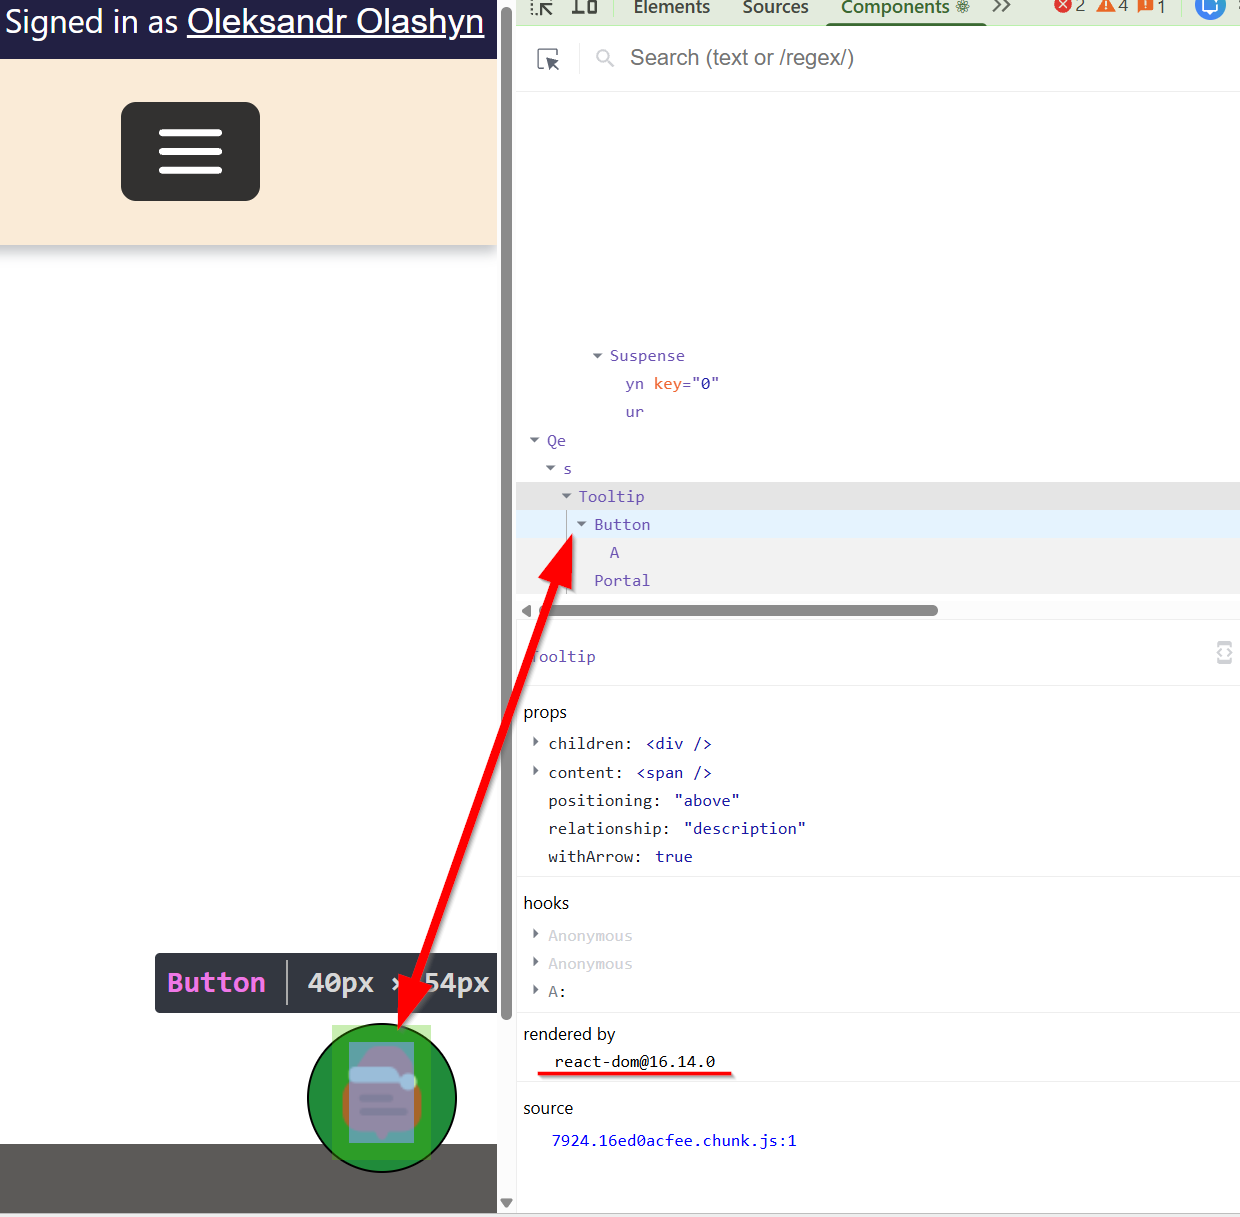
We can add the observer to the document body itself; however, there are multiple changes constantly happening to the document body, which will lead to multiple triggers of the callback function, that will be completely unrelated to what we need. So ideally, we want the observer to be as close to the part that we need. To do so, we need to understand what actually renders our agent.
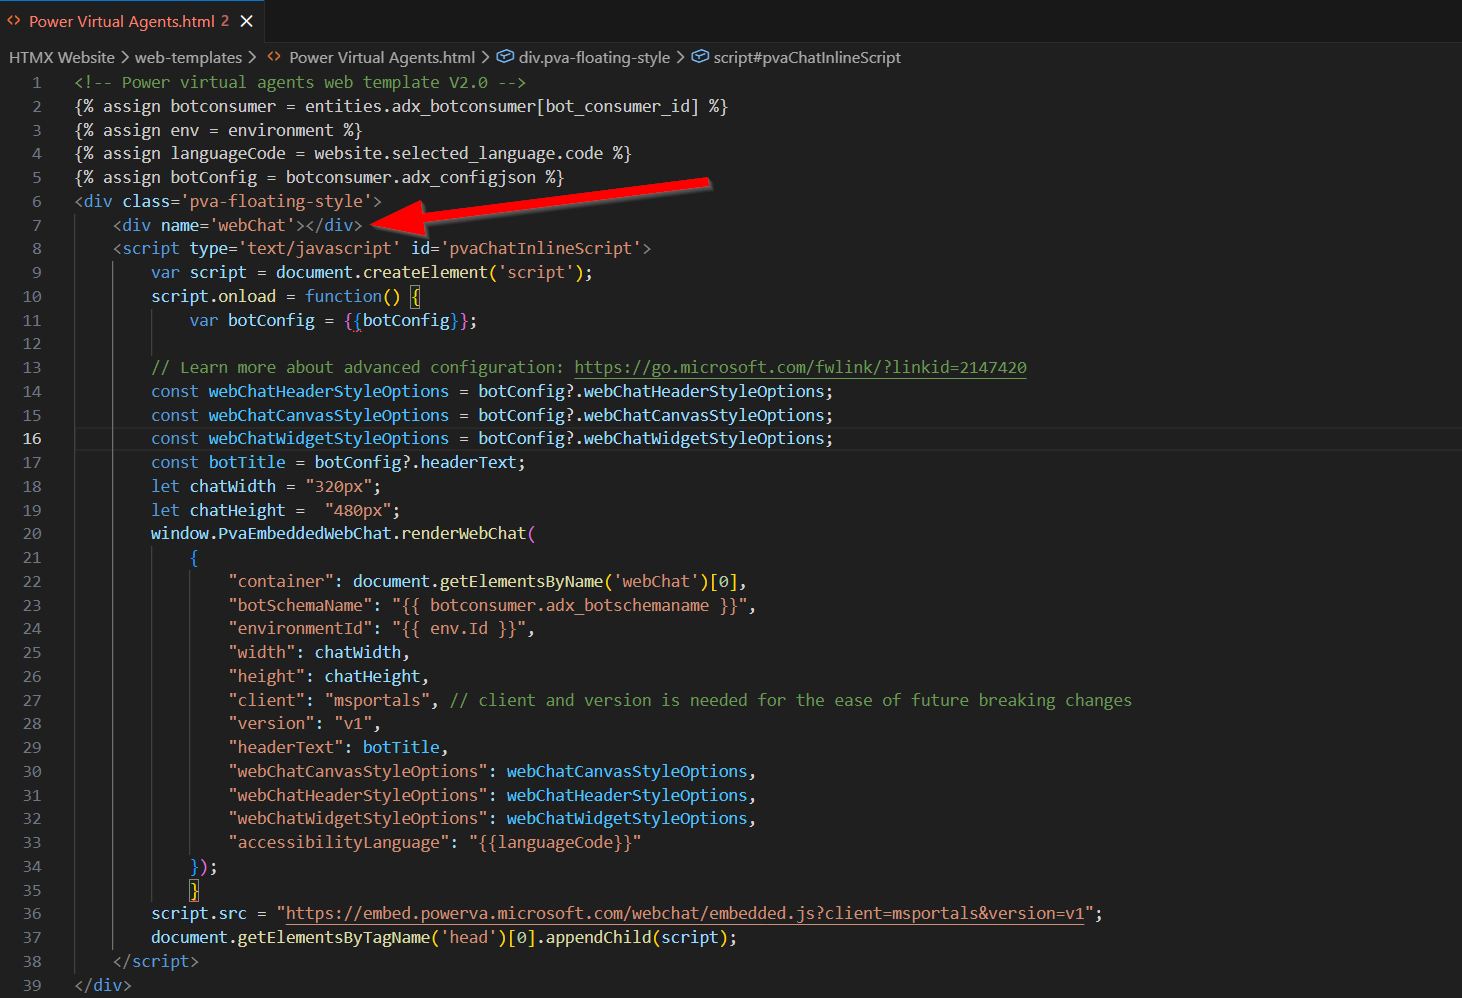
Microsoft has a web template called Power Virtual Agents. This template is automatically injected at the end of the page. After reviewing this template, we can see that the element that will be there from the start is the div with the name webChat.
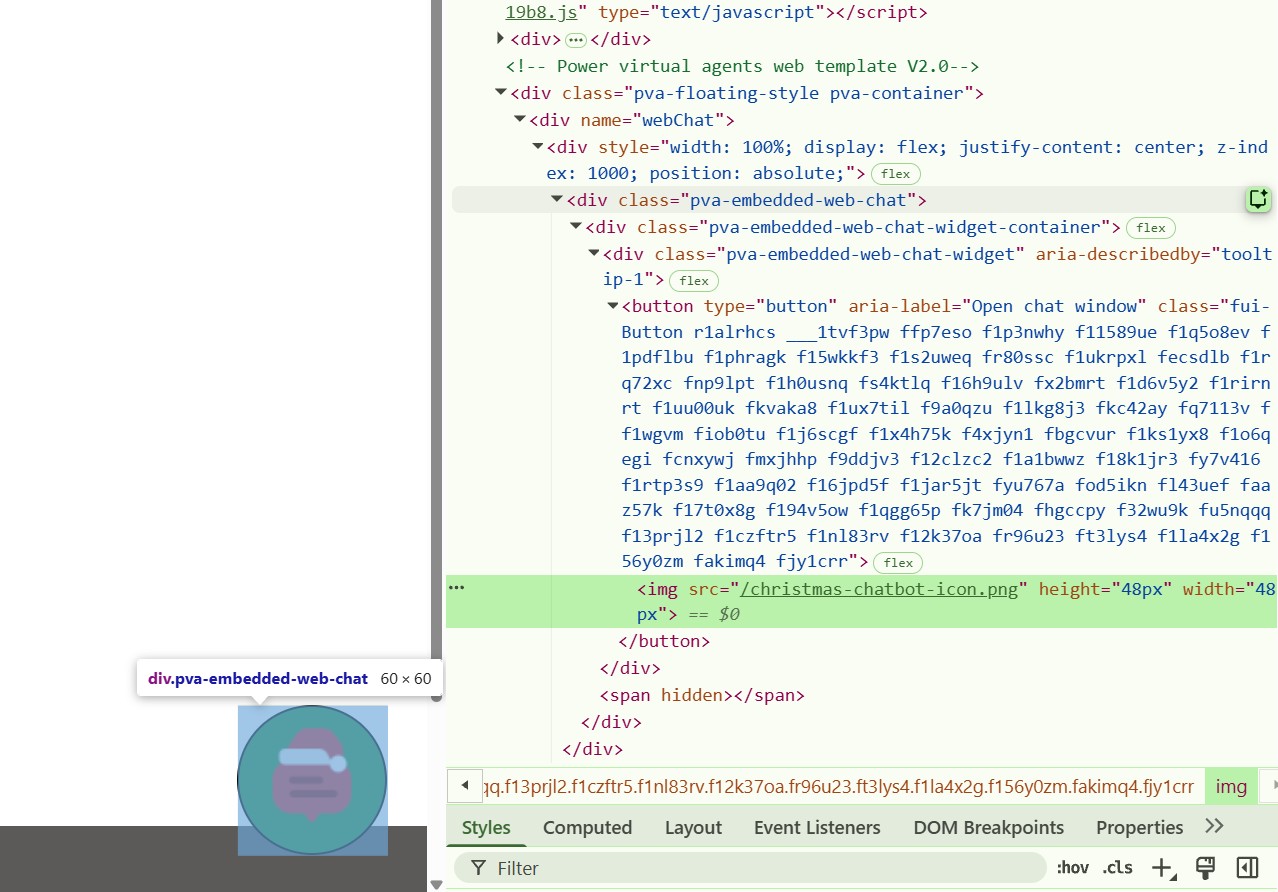
So let’s attach the observer to the “webChat” div element and wait until the div with the class “pva-embedded-web-chat” is rendered. Since it is rendered with our button as a subchild, this is exactly what we need.
const targetClass = 'pva-embedded-web-chat';

// Select the node that will be observed for mutations (e.g., the body)
const targetNode = document.getElementsByName("webChat")[0];

// Options for the observer: watch for child additions/removals and descendent changes
const config = {
    childList: true,
    subtree: true // Monitor all descendants
};

// Callback function to execute when mutations are observed
const callback = (mutationList, observer) => {
    for (const mutation of mutationList) {
        // Check if the mutation type is 'childList' (nodes added or removed)
        if (mutation.type === 'childList') {
            // Iterate over the added nodes
            for (const node of mutation.addedNodes) {
                // Check if the added node is an Element and has the target class
                if (node.nodeType === Node.ELEMENT_NODE && node.classList.contains(targetClass)) {
                    let button = document.querySelector(".pva-embedded-web-chat-widget > button");
                    // <a href="https://www.flaticon.com/free-icons/chat" title="chat icons">Chat icons created by Marz Gallery - Flaticon</a>
                    button.innerHTML = '<img src="/christmas-chatbot-icon.png" height="48px" width="48px" />';
                    // Stop observing once the element is found
                    observer.disconnect();
                }
            }
        }
    }
};

// Create a new MutationObserver instance with the callback function
const observer = new MutationObserver(callback);

// Start observing the target node for the configured mutations
observer.observe(targetNode, config);
Let’s apply the code, add some styling to make the widget a bit bigger, and see what we got.
Looks nice during the first load. However, as soon as we open the chat window and then close it again, we are back to square one (except for some styling changes). Why is that? Well, the answer is still React. It dynamically rerenders parts that are needed and removes our chat button with the changes. So what should we do to prevent it? The simplest way is to use the second observer.
We will add the second observer to the “pva-embedded-web-chat” div, as it stays the same between rerenders. Now we will wait until the div with the class “pva-embedded-web-chat-widget” is rendered. And we will re-add our image then.
function initialRenderObservation() {
    const targetClass = 'pva-embedded-web-chat';

    // Select the node that will be observed for mutations (e.g., the body)
    const targetNode = document.getElementsByName("webChat")[0];

    // Options for the observer: watch for child additions/removals and descendent changes
    const config = {
        childList: true,
        subtree: true // Monitor all descendants
    };

    // Callback function to execute when mutations are observed
    const callback = (mutationList, observer) => {
        for (const mutation of mutationList) {
            // Check if the mutation type is 'childList' (nodes added or removed)
            if (mutation.type === 'childList') {
                // Iterate over the added nodes
                for (const node of mutation.addedNodes) {
                    // Check if the added node is an Element and has the target class
                    if (node.nodeType === Node.ELEMENT_NODE && node.classList.contains(targetClass)) {
                        let button = document.querySelector(".pva-embedded-web-chat-widget > button");
                        // <a href="https://www.flaticon.com/free-icons/chat" title="chat icons">Chat icons created by Marz Gallery - Flaticon</a>
                        button.innerHTML = '<img src="/christmas-chatbot-icon.png" height="48px" width="48px" />';
                        // Stop observing once the element is found
                        observer.disconnect();
                        // Adding second observer
                        followUpRenderObservation();
                    }
                }
            }
        }
    };

    // Create a new MutationObserver instance with the callback function
    const observer = new MutationObserver(callback);

    // Start observing the target node for the configured mutations
    observer.observe(targetNode, config);
}

function followUpRenderObservation() {
    const targetClass = 'pva-embedded-web-chat-widget';

    // Select the node that will be observed for mutations (e.g., the body)
    const targetNode = document.getElementsByClassName("pva-embedded-web-chat")[0];

    // Options for the observer: watch for child additions/removals and descendent changes
    const config = {
        childList: true,
        subtree: true // Monitor all descendants
    };

    // Callback function to execute when mutations are observed
    const callback = (mutationList, observer) => {
        for (const mutation of mutationList) {
            // Check if the mutation type is 'childList' (nodes added or removed)
            if (mutation.type === 'childList') {
                // Iterate over the added nodes
                for (const node of mutation.addedNodes) {
                    // Check if the added node is an Element and has the target class
                    if (node.nodeType === Node.ELEMENT_NODE && node.classList.contains(targetClass)) {
                        let button = document.querySelector(".pva-embedded-web-chat-widget > button");
                        // <a href="https://www.flaticon.com/free-icons/chat" title="chat icons">Chat icons created by Marz Gallery - Flaticon</a>
                        button.innerHTML = '<img src="/christmas-chatbot-icon.png" height="48px" width="48px" />';
                    }
                }
            }
        }
    };

    // Create a new MutationObserver instance with the callback function
    const observer = new MutationObserver(callback);

    // Start observing the target node for the configured mutations
    observer.observe(targetNode, config);
}

$(document).ready(function () {
    initialRenderObservation();
});
Let’s apply the updated code and see what we get.
Much better now - exactly what we wanted.
Header customization
Next, we want to update the header - both background and text color. This is actually the same as in the documentation - just update the proper CSS class.
As for the colors, we will go with the classic Christmas combo of Red background and Gold text.
/* open chat header */
.pages-chatbot-header {
    background: #b11c2c;
    color: #ffe05c;
}
Looks great - moving to the final step now.
Chat bubble customization
To make chat bubble feel more festive, we will update Copilot responses to be Green with White text, and user responses to be Red with White text.
For the background we need to modify CSS a bit, comparing to what is specified in the docs - the background needs to be applied one level deeper to the “webchat__text-content” class.
The text styling works as documented.
And the final result looks great!
Final code can be found below:
<style>
    /* Widget */
    .pva-embedded-web-chat-widget {
        background-color: #208b3a;
        border: 1px solid #000000;
        width: 60px !important;
        max-width: 60px !important;
        height: 60px !important;
    }

    /* open chat header */
    .pages-chatbot-header {
        background: #b11c2c;
        color: #ffe05c;
    }

    /* Copilot text bubble */
    .webchat__bubble:not(.webchat__bubble--from-user) .webchat__bubble__content,
    .webchat__bubble:not(.webchat__bubble--from-user) .webchat__bubble__content .webchat__text-content {
        background-color: #075600 !important;
        border-radius: 5px !important;
    }

    .webchat__bubble:not(.webchat__bubble--from-user) p {
        font-weight: 400;
        color: #ffffff;
    }

    /* User text bubble */
    .webchat__bubble.webchat__bubble--from-user .webchat__bubble__content,
    .webchat__bubble.webchat__bubble--from-user .webchat__bubble__content .webchat__text-content {
        background-color: #b11c2c !important;
        border-radius: 5px !important;
    }

    .webchat__bubble.webchat__bubble--from-user p {
        font-weight: 400;
        color: #ffffff;
    }
</style>

<script>
    function initialRenderObservation() {
        const targetClass = 'pva-embedded-web-chat';

        // Select the node that will be observed for mutations (e.g., the body)
        const targetNode = document.getElementsByName("webChat")[0];

        // Options for the observer: watch for child additions/removals and descendent changes
        const config = {
            childList: true,
            subtree: true // Monitor all descendants
        };

        // Callback function to execute when mutations are observed
        const callback = (mutationList, observer) => {
            for (const mutation of mutationList) {
                // Check if the mutation type is 'childList' (nodes added or removed)
                if (mutation.type === 'childList') {
                    // Iterate over the added nodes
                    for (const node of mutation.addedNodes) {
                        // Check if the added node is an Element and has the target class
                        if (node.nodeType === Node.ELEMENT_NODE && node.classList.contains(targetClass)) {
                            let button = document.querySelector(".pva-embedded-web-chat-widget > button");
                            // <a href="https://www.flaticon.com/free-icons/chat" title="chat icons">Chat icons created by Marz Gallery - Flaticon</a>
                            button.innerHTML = '<img src="/christmas-chatbot-icon.png" height="48px" width="48px" />';
                            // Stop observing once the element is found
                            observer.disconnect();

                            followUpRenderObservation();
                        }
                    }
                }
            }
        };

        // Create a new MutationObserver instance with the callback function
        const observer = new MutationObserver(callback);

        // Start observing the target node for the configured mutations
        observer.observe(targetNode, config);
    }

    function followUpRenderObservation() {
        const targetClass = 'pva-embedded-web-chat-widget';

        // Select the node that will be observed for mutations (e.g., the body)
        const targetNode = document.getElementsByClassName("pva-embedded-web-chat")[0];

        // Options for the observer: watch for child additions/removals and descendent changes
        const config = {
            childList: true,
            subtree: true // Monitor all descendants
        };

        // Callback function to execute when mutations are observed
        const callback = (mutationList, observer) => {
            for (const mutation of mutationList) {
                // Check if the mutation type is 'childList' (nodes added or removed)
                if (mutation.type === 'childList') {
                    // Iterate over the added nodes
                    for (const node of mutation.addedNodes) {
                        // Check if the added node is an Element and has the target class
                        if (node.nodeType === Node.ELEMENT_NODE && node.classList.contains(targetClass)) {
                            let button = document.querySelector(".pva-embedded-web-chat-widget > button");
                            // <a href="https://www.flaticon.com/free-icons/chat" title="chat icons">Chat icons created by Marz Gallery - Flaticon</a>
                            button.innerHTML = '<img src="/christmas-chatbot-icon.png" height="48px" width="48px" />';
                        }
                    }
                }
            }
        };

        // Create a new MutationObserver instance with the callback function
        const observer = new MutationObserver(callback);

        // Start observing the target node for the configured mutations
        observer.observe(targetNode, config);
    }

    $(document).ready(function () {
        initialRenderObservation();
    });
</script>
Conclusion
In this article, I provided step-by-step instructions on how you can customize your Copilot agent in Power Pages, focusing on making it Christmas-themed. Hope you enjoyed this article.
Credits
Cover Image by Shawn Suttle from Pixabay