Sending files to cloud flows from Power Pages
Help UKRAINE
 ! Your action matters! Donate
to support Ukrainian Army! Donate to charity funds!
Organize/join street protests in your city to support Ukraine and condemn Russian aggression!
Expose and report Russian disinformation! #StandWithUkraine
! Your action matters! Donate
to support Ukrainian Army! Donate to charity funds!
Organize/join street protests in your city to support Ukraine and condemn Russian aggression!
Expose and report Russian disinformation! #StandWithUkraine Calling cloud flows from Power Pages was always a complicated endeavour from a security and general perspective. However, an introduction of native support for this back in June was a game changer. Now, we can even send files from Power Pages to cloud flows. Let’s see how it can be done and what pitfalls you need to avoid (including some issues with flows itself - see more at the end of the post). At the end of this article you will find the full code and demo on how this works, so feel free to jump ahead.
Action plan
We will add a file input to a webpage. On file load, we will call a cloud flow. This flow will accept a file input (image), save that file as a note, get that note from the system back and return it to Power Page to show the image on the screen.
Creating a flow
First, we need to create our cloud flow. To do so open the solution you want to create your flow from (as you can only call solution-aware flows from Power Pages). Select When Power Pages calls a flow as your trigger action. There you can select your inputs. For this sample, we will select two: file input called customFile and text input called customTextField.

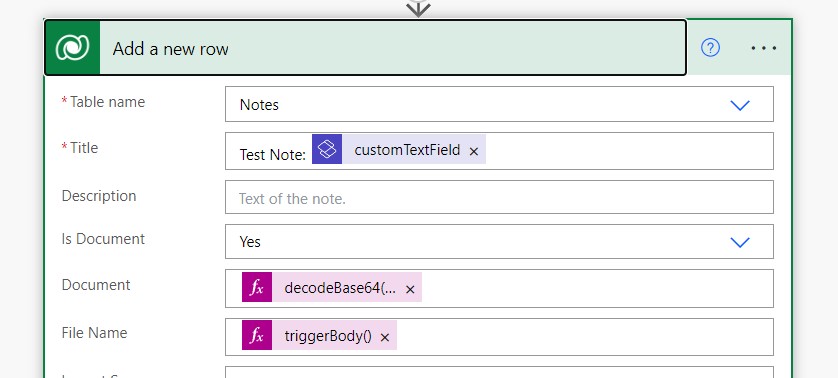
Next, we need to create a new note. We will select the Add Row action, select Notes as our Table and provide Title, DocumentBody (which is file content) and FileName. To get the file name we will use the next expression triggerBody()?[‘file’]?[‘name’]. To get the file body we could use the provided customFile option, however, because our file content is base64 string system sometimes throws the error when parsing (“Invalid character in field ‘documentbody’: ’.’, hexadecimal value 0x00, is an invalid character.”). To avoid this problem we can encode and decode string directly using the next formula: decodeBase64(base64(triggerBody()?[‘file’]?[‘contentBytes’])).
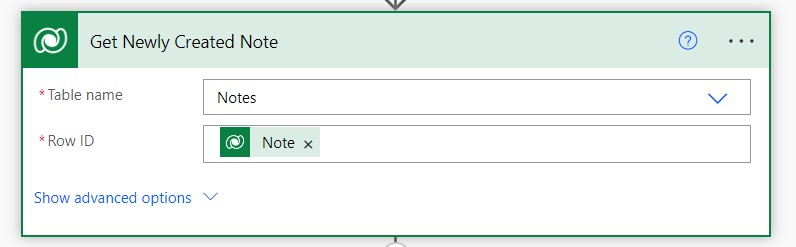
Now when the note is created let’s retrieve it back from the system.
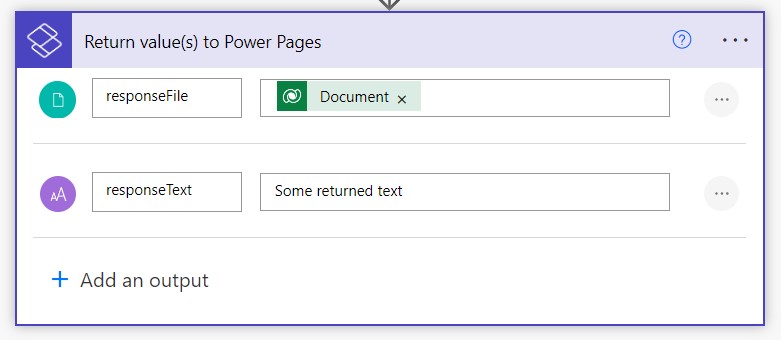
Last we need to return values to Power Pages: in responseFile output, we will return our image from the newly created note and in responseText output, we will return “Some returned text”.
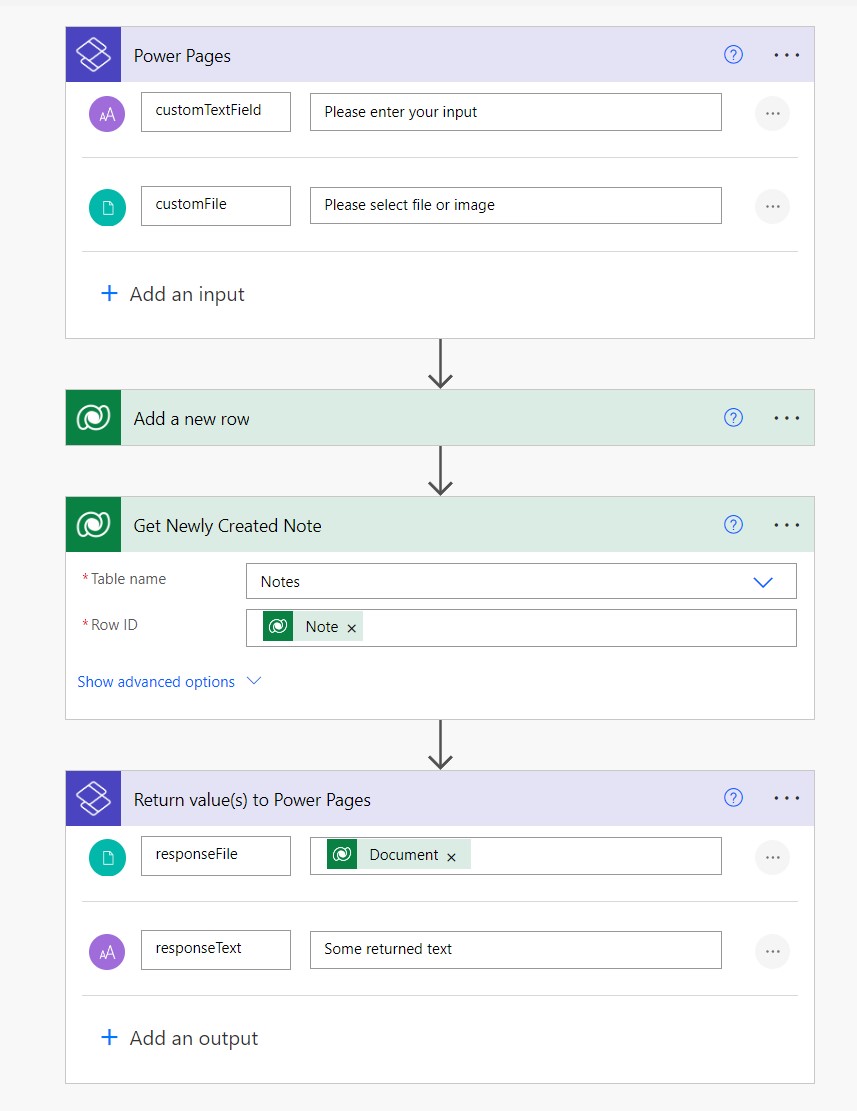
Now our flow looks like this.
Let’s move to the Power Pages part.
Add cloud flow to Power Pages
In Power Pages Studio navigate to the Set up section and select Cloud flows under integration. Select Add existing flow, choose newly created flow and select Web Roles that will be allowed to call the flow.

After that click the Copy icon in the URL field to copy the URL of the flow. We will use it later to call the flow from the code.
Call flow from Power Pages
Open a page from which you want to call the flow. In this example, I will use VSCode online for code editing.
Let’s add the next HTML code: simple file input ( with the sendAndReceiveFile function that will be triggered on the change event), an image to show the returned file and some explanation text.
<p>Choose a file to save as a note in the system</p>
<input type="file" name="" onchange="sendAndReceiveFile()" />
<img id="returnedImage" />
First, we need to manage our file input. We will create a function called sendAndReceiveFile which will create a new file reader and read our file as a data URL (we need this as flow accepts files as base64 encoded string).
  function sendAndReceiveFile() {
    // get our input
    const file = document.querySelector("input[type=file]").files[0];
    //initialize new file reader
    const reader = new FileReader();

    // trigger sendToFlow function
    // when file reading ends
    reader.addEventListener(
      "load",
      () => {
        // get base64 string without 'data:image/jpeg;base64' part
        const base64str = reader.result.split(',')[1];
        sendToFlow(file.name, base64str);
      },
      false,
    );

    if (file) {
      // read file from our input as base64 encoded string
      reader.readAsDataURL(file);
    }

  }
Next, we need to create a function which will call the flow itself. We will call it sendToFlow and will accept the file name and base64 encoded file body.
We need to form a request object. First, we create an object with our inputs. The name of the inputs should be the same as in the Power Pages trigger. File input should be an object with two properties: name - to hold the name of the file and contentBytes - which will contain base64 string.
    let data = {
      customTextField: "Hi, I am text from site",
      customFile: {
        name: fileName,
        contentBytes: b64str
      }
    };
The request object itself should only have one parameter eventData - which should be a stringified version of the object with inputs.
    let requestObj = {
      eventData: JSON.stringify(data)
    };
To call the flow I will be using shell.ajaxSafePost method provided by MS - this way I don’t need to worry about adding a CSRF token to my requests. However, you are free to use fetch or another way to create a POST request as long as you handle token generation and include it in the correct header with the request.
The URL for the request would be a simplified version of the URL we copied when we configured cloud flow. We removed a part before /api to make it universal and avoid issues with environment-specific deployments.
    shell.ajaxSafePost({
      type: "POST",
      contentType: "application/json",
      url: "/_api/cloudflow/v1.0/trigger/YOUR_CLOUD_FLOW_GUID",
      data: JSON.stringify(requestObj),
      processData: false,
      global: false
    })
      .done(function (response) {
        handleFlowResponse(response);
      })
      .fail(function (er) {
        console.error(er);
      });
Last, we need to create a function that will handle the response from the flow. handleFlowResponse will parse the returned string as an object. This object will contain our outputs. IMPORTANT - as of now returned object have our output name in lowercase so make sure you use the correct names. Let’s add our returned image to the page and observe the result.
  function handleFlowResponse(response) {
    const responseObj = JSON.parse(response);
    console.log("responseObj", responseObj);
    const previewImg = document.getElementById("returnedImage");
    previewImg.src = "data:image/jpeg;base64," + responseObj.responsefile;
  }
RESULT
Below you can find small demo of sending and receiving file form cloud flow:
ERRORS AND ISSUES
When you call the flow you might receive an error that input parameters are in incorrect format. Please check your flow as an error might be caused by problems in other parts of the flow unrelated to the inputs.
IMPORTANT Currently, there is an issue with sending files more than 2mb in size. You will get: “Error during serialization or deserialization using the JSON JavaScriptSerializer. The length of the string exceeds the value set on the maxJsonLength property. Parameter name: input”. Microsoft was notified about this problem.
Potential workaround: thanks to Lyle Stanton for suggestion.
To avoid this issue try to not provide contentType explicetly, remove processData and global from the ajaxSafePost request and do not stringify request object
  function sendToFlow(fileName, b64str) {
    // create object with inputs
    // file input should have both name which holds filename
    // and contentBytes which holds base64 string representation of the file
    let data = {
      customTextField: "Hi, I am text from site",
      customFile: {
        name: fileName,
        contentBytes: b64str
      }
    };

    // actual request object should have only one parameter
    // called eventData which shoould be stringified
    // version of the object with inputs
    let requestObj = {
      eventData: JSON.stringify(data)
    };

    // I am using ajaxSafePost as it automatically adds
    // CSRF token, however, you can use fetch or other method
    // as long as you manually handle getting the token
    // and adding it to appropriate header
    shell.ajaxSafePost({
      type: "POST",
      contentType: "application/json",
      url: "/_api/cloudflow/v1.0/trigger/YOUR_CLOUD_FLOW_GUID",
      data: requestObj,
    })
      .done(function (response) {
        handleFlowResponse(response);
      })
      .fail(function (er) {
        console.error(er);
      });
  }
CONCLUSION
Cloud flows in Power Pages are a huge addition to the product, which extends its capabilities tremendously. And the addition of File type input pushed it even further. Calling cloud flows from the site is quite straightforward, however, documentation around it could be better. I am happy the product is growing, and moving forward will be using Power Automate to achieve even more. Hope you find this article useful.
Full code
<p>Choose a file to save as a note in the system</p>
<input type="file" name="" onchange="sendAndReceiveFile()" />
<img id="returnedImage" />
<script>

  function handleFlowResponse(response) {
    const responseObj = JSON.parse(response);
    console.log("responseObj", responseObj);
    const previewImg = document.getElementById("returnedImage");

    //using lower case responsefile instead of responseFile
    //as currently cloud flow returns everything lowercase
    previewImg.src = "data:image/jpeg;base64," + responseObj.responsefile;
  }

  function sendToFlow(fileName, b64str) {
    // create object with inputs
    // file input should have both name which holds filename
    // and contentBytes which holds base64 string representation of the file
    let data = {
      customTextField: "Hi, I am text from site",
      customFile: {
        name: fileName,
        contentBytes: b64str
      }
    };

    // actual request object should have only one parameter
    // called eventData which shoould be stringified
    // version of the object with inputs
    let requestObj = {
      eventData: JSON.stringify(data)
    };

    // I am using ajaxSafePost as it automatically adds
    // CSRF token, however, you can use fetch or other method
    // as long as you manually handle getting the token
    // and adding it to appropriate header
    shell.ajaxSafePost({
      type: "POST",
      contentType: "application/json",
      url: "/_api/cloudflow/v1.0/trigger/YOUR_CLOUD_FLOW_GUID",
      data: JSON.stringify(requestObj),
      processData: false,
      global: false
    })
      .done(function (response) {
        handleFlowResponse(response);
      })
      .fail(function (er) {
        console.error(er);
      });
  }

  function sendAndReceiveFile() {

    // get our input
    const file = document.querySelector("input[type=file]").files[0];
    //initialize new file reader
    const reader = new FileReader();

    // trigger sendToFlow function
    // when file reading ends
    reader.addEventListener(
      "load",
      () => {
        // get base64 string without 'data:image/jpeg;base64' part
        const base64str = reader.result.split(',')[1];
        sendToFlow(file.name, base64str);
      },
      false,
    );

    if (file) {
      // read file from our input as base64 encoded string
      reader.readAsDataURL(file);
    }

  }
</script>