Using Adaptive Cards in PCF
Help UKRAINE
 ! Your action matters! Donate
to support Ukrainian Army! Donate to charity funds!
Organize/join street protests in your city to support Ukraine and condemn Russian aggression!
Expose and report Russian disinformation! #StandWithUkraine
! Your action matters! Donate
to support Ukrainian Army! Donate to charity funds!
Organize/join street protests in your city to support Ukraine and condemn Russian aggression!
Expose and report Russian disinformation! #StandWithUkraine In PowerApps Community forum there was the section with new ideas and exploration for new PCF controls. And one particular caught my eye - Adaptive Cards.
![]()
What are Adaptive Cards?
Adaptive Cards are an easy way to create a card like content that will adapt to host application design. You just describe your card content using JSON schema and pass it to a renderer. As a result, the card will feel like a native part of an application. Adaptive cards can be used inside Teams, Skype, Bots, Outlook, etc.
The card can contain a wide variety of things: text, images, videos, action buttons, inputs. To make developers life easier Microsoft presented visual designer where using drag-and-drop items you can compose your card easily (you can find it here).
If you want to know more about Adaptive Cards please visit their official website. Also, I can recommend a great article by Tomasz Poszytek to learn Adaptive Cards in depth.
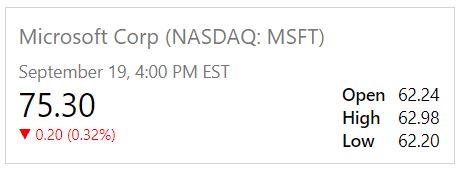
In this article, I will use a sample from Adaptive Cards official site - Stock update. That’s how our card looks like as a sample.
Building sample PCF control with Adaptive Cards
Let’s start building our control. I will call my control StockMarketCard. I will omit steps to setup PCF control project, but if you are not familiar with that you can find everything you need in Microsoft official docs here.
First, you need to install Adaptive Cards using npm. You can do it with next command:
npm install adaptivecards --saveAfter the installation, you need to import AdaptiveCards module. To do so you need to add next line to your index.ts file:
import * as AdaptiveCards from "adaptivecards";Great. Now we can use AdaptiveCards in our component. Inside your init function add next code:
// Create an AdaptiveCard instance
let adaptiveCard = new AdaptiveCards.AdaptiveCard();

// Set its hostConfig property unless you want to use the default Host Config
// Host Config defines the style and behavior of a card
adaptiveCard.hostConfig = new AdaptiveCards.HostConfig({
    fontFamily: "Segoe UI, Helvetica Neue, sans-serif"
});

 // Parse the card payload
adaptiveCard.parse(card);

// Render the card to an HTML element:
let renderedCard = adaptiveCard.render();

// And finally insert it somewhere in your page:
container.appendChild(renderedCard);
We still miss the key component - card schema itself. Let’s grab it from Adaptive Cards samples and insert in init function before adaptive card initialization.
let card = {
  "$schema": "http://adaptivecards.io/schemas/adaptive-card.json",
  "type": "AdaptiveCard",
  "version": "1.0",
  "speak": "Microsoft stock is trading at $62.30 a share, which is down .32%",
  "body": [
    {
      "type": "Container",
      "items": [
        {
          "type": "TextBlock",
          "text": "Microsoft Corp (NASDAQ: MSFT)",
          "size": "medium",
          "isSubtle": true
        },
        {
          "type": "TextBlock",
          "text": "September 19, 4:00 PM EST",
          "isSubtle": true
        }
      ]
    },
    {
      "type": "Container",
      "spacing": "none",
      "items": [
        {
          "type": "ColumnSet",
          "columns": [
            {
              "type": "Column",
              "width": "stretch",
              "items": [
                {
                  "type": "TextBlock",
                  "text": "75.30",
                  "size": "extraLarge"
                },
                {
                  "type": "TextBlock",
                  "text": "▼ 0.20 (0.32%)",
                  "size": "small",
                  "color": "attention",
                  "spacing": "none"
                }
              ]
            },
            {
              "type": "Column",
              "width": "auto",
              "items": [
                {
                  "type": "FactSet",
                  "facts": [
                    {
                      "title": "Open",
                      "value": "62.24"
                    },
                    {
                      "title": "High",
                      "value": "62.98"
                    },
                    {
                      "title": "Low",
                      "value": "62.20"
                    }
                  ]
                }
              ]
            }
          ]
        }
      ]
    }
  ]
}
That’s it. Now you can use npm run start to check out how your component looks and feels. There are a lot of examples on AdaptiveCards that you can use, so definitely check it out.
Adding logic to the control
The control that we build above looks good, but it is just an example of how easily you can add Adaptive Cards into PCF. Unfortunately, it does nothing, as all values are hard-coded. Let’s extended it a bit to fetch real data from the input and modify card depending on it.
First, we need to find an API that supports querying stock market data. My choice was Alpha Vantage - it is free and easy to use. As a part of this component, I will use their example with Microsoft and demo key, but if you want to query real data you will need to get your API key.
Demo query will return to us all the information that we need to display. Now we need to create a function that will receive the symbol and API key as parameters and then will call some function that will build a card. I named this function getStockInfo and it uses fetch to get stock info.
private getStockInfo(symbol: string, apiKey: string) {
    fetch("https://www.alphavantage.co/query?function=GLOBAL_QUOTE&symbol=" + symbol + "&apikey="+apiKey)
        .then((response) => {
            return response.json();
        })
        .then((quoteJson) => {
            console.log(quoteJson);
            this.createCard(quoteJson);
        });
    }
Next function is called createCard - it will receive quote JSON, parse it, modify card schema JSON and render it using code that we created previously.
private createCard(quoteJson: any) {

    let quoteDetails: QuoteDetails = {
        Symbol: quoteJson["Global Quote"]["01. symbol"],
        TradingDay: quoteJson["Global Quote"]["07. latest trading day"],
        Price: parseFloat(quoteJson["Global Quote"]["05. price"]),
        Open: parseFloat(quoteJson["Global Quote"]["02. open"]),
        High: parseFloat(quoteJson["Global Quote"]["03. high"]),
        Low: parseFloat(quoteJson["Global Quote"]["04. low"]),
        Change: parseFloat(quoteJson["Global Quote"]["09. change"]),
        ChangePercent: parseFloat(quoteJson["Global Quote"]["10. change percent"]
            .toString().replace("%", ""))
    };

    let card = this.getCard(quoteDetails);

    let adaptiveCard = new AdaptiveCards.AdaptiveCard();

    adaptiveCard.hostConfig = new AdaptiveCards.HostConfig({
        fontFamily: "Segoe UI, Helvetica Neue, sans-serif"
    });

    adaptiveCard.parse(card);

    let renderedCard = adaptiveCard.render();

    this._container.appendChild(renderedCard);
}
You might notice an interface called QuoteDetails - I made it to work more easily with quote details because demo JSON object from Alpha Vantage has naming that wasn’t easily usable.
Last is getCard function - it will use QuoteDetails object to set correct data into our card JSON schema.
private getCard(quoteDetails: QuoteDetails) {
    let arrowSymbol = "▲";
    let changeColor = "Good";

    if(quoteDetails.ChangePercent < 0){
        arrowSymbol = "▼";
        changeColor = "Attention";
    }

    let changeText = arrowSymbol + " " +
        quoteDetails.Change.toFixed(2).toString() + " "+
        "(" + quoteDetails.ChangePercent.toFixed(2).toString()+ "% )";

    let card = {
            "$schema": "http://adaptivecards.io/schemas/adaptive-card.json",
            "type": "AdaptiveCard",
            "version": "1.0",
            "speak": "Microsoft stock is trading at $62.30 a share, which is down .32%",
            "body": [
                {
                    "type": "Container",
                    "items": [
                        {
                            "type": "TextBlock",
                            "text": quoteDetails.Symbol,
                            "size": "Medium",
                            "isSubtle": true
                        },
                        {
                            "type": "TextBlock",
                            "text": quoteDetails.TradingDay,
                            "isSubtle": true
                        }
                    ]
                },
                {
                    "type": "Container",
                    "spacing": "None",
                    "items": [
                        {
                            "type": "ColumnSet",
                            "columns": [
                                {
                                    "type": "Column",
                                    "width": "stretch",
                                    "items": [
                                        {
                                            "type": "TextBlock",
                                            "text": quoteDetails.Price.toFixed(2).toString(),
                                            "size": "ExtraLarge"
                                        },
                                        {
                                            "type": "TextBlock",
                                            "text": changeText,
                                            "size": "Small",
                                            "color": changeColor,
                                            "spacing": "None"
                                        }
                                    ]
                                },
                                {
                                    "type": "Column",
                                    "width": "auto",
                                    "items": [
                                        {
                                            "type": "FactSet",
                                            "facts": [
                                                {
                                                    "title": "Open",
                                                    "value": quoteDetails.Open.toFixed(2).toString()
                                                },
                                                {
                                                    "title": "High",
                                                    "value": quoteDetails.High.toFixed(2).toString()
                                                },
                                                {
                                                    "title": "Low",
                                                    "value": quoteDetails.Low.toFixed(2).toString()
                                                }
                                            ]
                                        }
                                    ]
                                }
                            ]
                        }
                    ]
                }
            ]
        };
Our component is almost ready. We just need to specify two input parameters in ControlManifest.Input.xml - Symbol and ApiKey.
<property name="Symbol" display-name-key="Symbol" description-key="Input stock symbol" of-type="SingleLine.Text" usage="bound" required="false" />
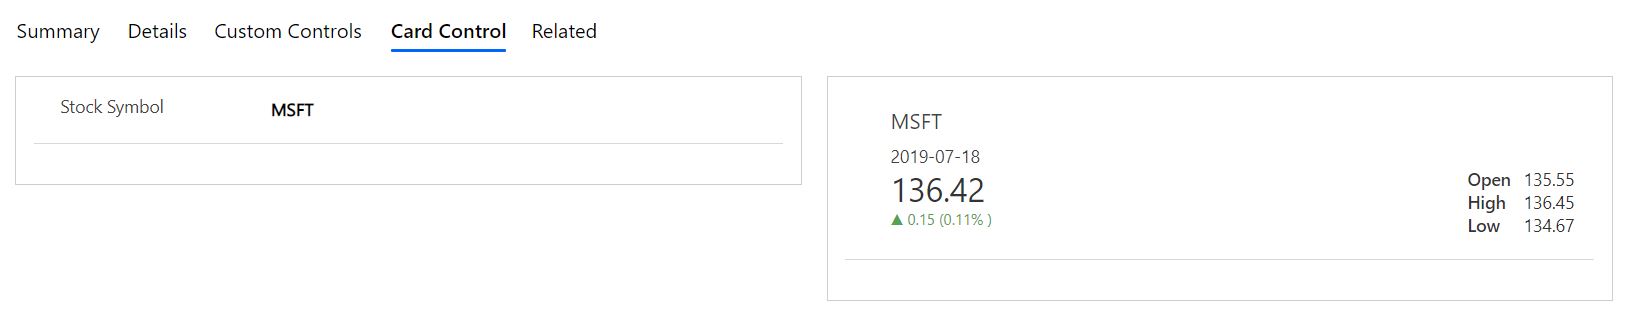
<property name="ApiKey" display-name-key="ApiKey" description-key="Your Alpha Ventage API key" of-type="SingleLine.Text" usage="bound" required="false" />Now our component has all the necessary parts. You can find the full code and managed solution in my GitHub repository. Below you can see how it looks like in Dynamics.
Now you know how to add Adaptive Cards to your PCF control. Hope you find this article useful.